
💚 Layer Pistachio Cake with Frosting

Pistachio Layer Cake is a soft, nutty, and elegant dessert made with finely chopped pistachios and a light, fluffy cake crumb. The subtle sweetness of pistachios combined with a smooth creamy frosting creates a perfectly balanced flavor. This cake is both beautiful and delicious, making it perfect for special occasions, afternoon tea, or family gatherings.
🛒 Ingredients
For the Pistachio Cake
- 2 ¼ cups all-purpose flour
- 1 teaspoon baking powder
- ½ teaspoon baking soda
- ½ teaspoon salt
- 1 cup unsalted butter (softened)
- 1 ½ cups granulated sugar
- 4 large eggs
- 1 teaspoon vanilla extract
- 1 teaspoon almond extract (optional but recommended)
- 1 cup whole milk
- 1 cup finely chopped pistachios
- ½ cup ground pistachios (almost like powder)
For the Cream Frosting
- 8 oz cream cheese (softened)
- ½ cup unsalted butter (softened)
- 3 cups powdered sugar
- 1 teaspoon vanilla extract
- 2–3 tablespoons heavy cream
For Decoration
- ½ cup chopped pistachios
- Optional: toasted coconut flakes or white chocolate shavings
👩🍳 Instructions
1️⃣ Prepare the Oven
Preheat the oven to 350°F (175°C).
Grease and line two 8- or 9-inch cake pans with parchment paper.
2️⃣ Mix the Dry Ingredients
In a bowl whisk together:
- Flour
- Baking powder
- Baking soda
- Salt
Set aside.
3️⃣ Cream Butter and Sugar
In a large bowl beat butter and sugar for about 3–4 minutes until the mixture becomes light, fluffy, and pale. This step helps create a soft cake texture.
4️⃣ Add Eggs and Flavor
Add the eggs one at a time, mixing well after each addition.
Then mix in:
- Vanilla extract
- Almond extract
5️⃣ Combine Wet and Dry Ingredients
Gradually add the dry ingredients while alternating with milk. Mix gently until smooth.
Fold in the chopped pistachios and ground pistachios to give the cake a rich nutty flavor.
6️⃣ Bake the Cake
Divide the batter evenly between the prepared cake pans.
Bake for 30–35 minutes or until a toothpick inserted in the center comes out clean.
Let the cakes cool completely before frosting.
7️⃣ Prepare the Frosting
In a mixing bowl beat cream cheese and butter until smooth and creamy.
Gradually add powdered sugar, then mix in vanilla extract and heavy cream until the frosting becomes light and fluffy.
8️⃣ Assemble the Cake
Place one cake layer on a serving plate.
Spread a thick layer of frosting on top.
Place the second cake layer and frost the top and sides evenly.
9️⃣ Decorate
Sprinkle chopped pistachios on top of the cake for a beautiful finish and extra crunch.
🍽 Serving Ideas
This cake tastes amazing with:
☕ Coffee or espresso
🍵 Green tea
🍦 Vanilla ice cream
✨ Baker’s Tip: Lightly toast the pistachios for 5 minutes before adding them to the batter. This brings out a stronger, richer pistachio flavor.
- No-Bake Strawberry Cheesecake Cups
 No-Bake Strawberry Cheesecake Cups Meta Description:These No-Bake Strawberry Cheesecake Cups are creamy, refreshing, and incredibly easy to make. Layered with a buttery graham cracker crust, silky cheesecake filling, and … Read more
 - Watermelon, Feta & Mint Salad
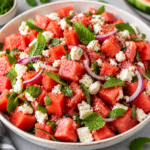 Watermelon, Feta & Mint Salad **Meta Description:**This Watermelon, Feta & Mint Salad is a refreshing summer recipe made with juicy watermelon, creamy feta cheese, fresh mint, cucumber, and a … Read more
 - Creamy Lemon Parmesan Summer Pasta
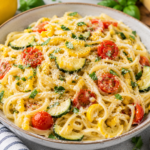 Creamy Lemon Parmesan Summer Pasta Meta Description:This Creamy Lemon Parmesan Summer Pasta is a light yet creamy dish made with fresh lemon, Parmesan cheese, garlic, spinach, and herbs. It’s … Read more
 - Honey Garlic Salmon with Corn Salsa
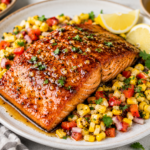 Honey Garlic Salmon with Corn Salsa Meta Description:This Honey Garlic Salmon with Corn Salsa is a fresh and flavorful summer dinner featuring perfectly glazed salmon topped with a vibrant … Read more
 - Blackened Fish Tacos with Lime Slaw
 Blackened Fish Tacos with Lime Slaw Meta Description:These Blackened Fish Tacos with Lime Slaw are packed with bold spices, flaky fish, crisp cabbage, and a creamy lime sauce. A … Read more