
🍰 No-Bake Oreo Cheesecake (Creamy & Perfect)
This No-Bake Oreo Cheesecake is rich, smooth, and incredibly easy to make—no oven needed! It has a crunchy Oreo crust, a silky cream cheese filling loaded with crushed Oreos, and a light whipped topping that makes every bite irresistible.
🛒 Ingredients
For the Crust
- 24 Oreo cookies
- 5 tablespoons melted butter
For the Cheesecake Filling
- 500g cream cheese (softened)
- 1 cup heavy whipping cream (cold)
- ¾ cup powdered sugar
- 1 teaspoon vanilla extract
- 12 Oreo cookies (crushed)
For the Topping
- 1 cup whipped cream
- 4–6 whole Oreos
- Extra crushed Oreos for garnish
👩🍳 Instructions
1️⃣ Make the Crust
Crush the Oreo cookies into fine crumbs using a food processor or by placing them in a plastic bag and crushing with a rolling pin.
Mix the crumbs with melted butter until the texture resembles wet sand.
Press the mixture firmly into the bottom of a springform pan to form an even crust.
Place in the refrigerator for 20–30 minutes to set.
2️⃣ Prepare the Filling
In a large bowl, beat the cream cheese until smooth and creamy.
Add:
- Powdered sugar
- Vanilla extract
Mix until well combined.
3️⃣ Whip the Cream
In a separate bowl, whip the cold heavy cream until stiff peaks form.
Gently fold the whipped cream into the cream cheese mixture. This keeps the cheesecake light and fluffy.
4️⃣ Add Oreos
Fold in the crushed Oreos evenly throughout the mixture.
5️⃣ Assemble the Cheesecake
Remove the crust from the fridge.
Pour the cheesecake filling over the crust and smooth the top using a spatula.
6️⃣ Chill
Refrigerate for at least 6 hours, preferably overnight, until fully set.
7️⃣ Decorate & Serve
Top with whipped cream, whole Oreos, and extra crushed cookies.
Slice and enjoy your creamy, dreamy dessert!
💡 Tips for Best Results
✨ Use full-fat cream cheese for the creamiest texture
✨ Chill overnight for perfect firmness
✨ For clean slices, dip your knife in warm water before cutting
🍽 Optional Variations
- Add melted chocolate to the filling for a richer taste
- Drizzle chocolate or caramel sauce on top
- Use golden Oreos for a different flavor twist
- Creamy Lemon Parmesan Summer Pasta
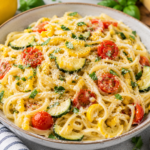 Creamy Lemon Parmesan Summer Pasta Meta Description:This Creamy Lemon Parmesan Summer Pasta is a light yet creamy dish made with fresh lemon, Parmesan cheese, garlic, spinach, and herbs. It’s the perfect quick summer dinner, ready in just 25 minutes. Creamy Lemon Parmesan Summer Pasta Introduction Looking for a comforting pasta that still feels fresh enough … Read more
 - Honey Garlic Salmon with Corn Salsa
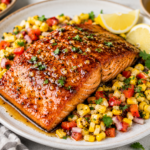 Honey Garlic Salmon with Corn Salsa Meta Description:This Honey Garlic Salmon with Corn Salsa is a fresh and flavorful summer dinner featuring perfectly glazed salmon topped with a vibrant sweet corn salsa. Ready in just 30 minutes and perfect for healthy weeknight meals. Honey Garlic Salmon with Corn Salsa Introduction Nothing tastes more like summer … Read more
 - Blackened Fish Tacos with Lime Slaw
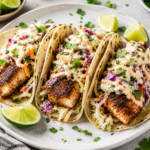 Blackened Fish Tacos with Lime Slaw Meta Description:These Blackened Fish Tacos with Lime Slaw are packed with bold spices, flaky fish, crisp cabbage, and a creamy lime sauce. A fresh, easy, and delicious summer dinner ready in just 30 minutes. Blackened Fish Tacos with Lime Slaw Introduction Bring the flavors of the coast to your … Read more
 - Mango Avocado Grilled Chicken Salad
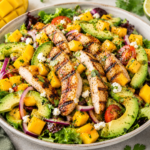 Mango Avocado Grilled Chicken Salad Meta Description:This Mango Avocado Grilled Chicken Salad is a fresh and healthy summer recipe featuring juicy grilled chicken, ripe mango, creamy avocado, crisp vegetables, and a homemade honey lime dressing. Mango Avocado Grilled Chicken Salad Introduction Fresh, colorful, and bursting with tropical flavor, this Mango Avocado Grilled Chicken Salad is … Read more
 - Garlic Butter Shrimp with Lemon Rice
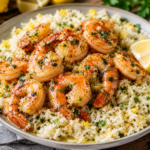 Garlic Butter Shrimp with Lemon Rice Meta Description:Enjoy this Garlic Butter Shrimp with Lemon Rice, a quick and flavorful summer dinner made with juicy shrimp, buttery garlic sauce, fresh herbs, and fluffy lemon-infused rice. Ready in just 30 minutes. Garlic Butter Shrimp with Lemon Rice Introduction Looking for a light yet satisfying summer dinner? This … Read more